Setup DCMTK with CMake for C++ and Visual Studio 2019 development

DCMTK consists of a set of libraries and applications that implement a large part of the DICOM standard, which contains functionality to examine, build and modify DICOM images, as well as send and receive images through a network connection.
When using C++ the ideal is to develop with Visual Studio, but in order to generate the files with the libraries and the project that would use DCMTK we have used the CMake program.
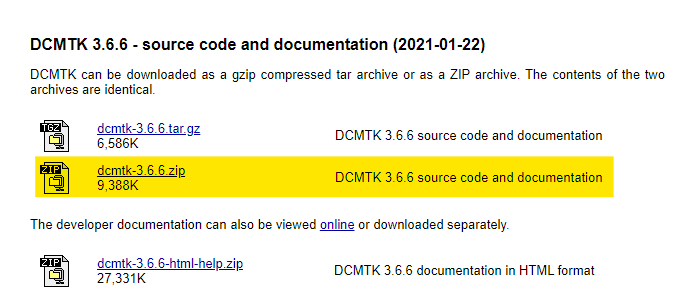
First we have to download the source code and documentation of the library provided by the web page https://dicom.offis.de/dcmtk.php.en in the section DCMTK 3.6.6 — source code and documentation (2021–01–22).

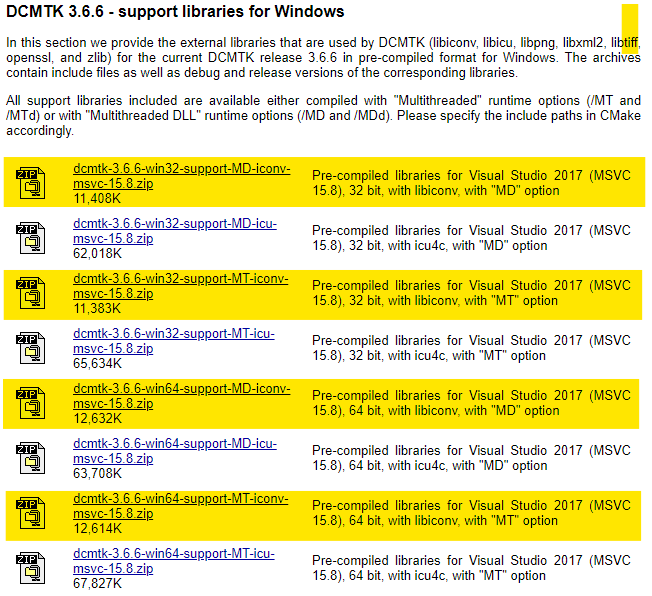
To use the DCMTK functionalities you need the external ICONV libraries, which you can download from the same web page https://dicom.offis.de/dcmtk.php.enen the DCMTK 3.6.6 — support libraries for Windows section below.

As you can see there are different options depending on what we need, in this case I will use the external 64bit iconv libraries with the MD option (dcmtk-3.6.6-win64-support-MD-iconv-msvc-15.8.zip) This means that the rest of the guide will be done for this option.
Finally we will need the CMake program https://cmake.org/download/ to be able to generate and install the library, and the latest version of Visual Studio Community https://visualstudio.microsoft.com/es/ to be able to develop the application.
With all this we would already have everything necessary to begin with the installation and configuration of the library, for it the first thing we have to do is to extract the folder with the source code, and the external libraries in a place that we can locate, and then to execute CMake, in this program we should establish the route of the source code and the one of the folder in which they are going to generate binaries that we will use to install DCMTK, this can be invented since in case of not existing the own program generates it to us, therefore it should be something like this:

Then click on the “Configure” button that will ask for the version of Visual Studio for which the project will be generated, in my case I will select “Visual Studio 16 2019” as it is the version I have installed on my computer. It is important to explicitly set the Optional platform for generator field to x64, do not leave it empty.

The rest of the options do not need to be changed, therefore, once the VS version is selected, click on “Finish”, which will fill the CMake screen with different configuration parameters.
To be able to see all the parameters that are going to be modified, check the “Advanced” box and to be able to see them more clearly, check the “Grouped” box.

Most of the parameters can be left as they are, however, there are some that must be changed for the project to be generated correctly:
- First of all, in the CMAKE group, the parameters indicating /MT or MTd flags must be changed to /MD and /MDd as shown in the following screenshot:

- In the DCMTK group it is important to uncheck the DCMTK_OVERWRITE_WIN32_COMPILER_FLAGS checkbox.
- DCMTK functionalities depend on the support libraries that we have previously downloaded, but which have to be activated by checking the DCMTK_WITH_INCONV, DCMTK_WITH_OPENSSL, DCMTK_WITH_PNG, DCMTK_WITH_TIFF, DCMTK_WITH_XML and DCMTK_WITH_ZLIB parameter boxes located in the DCMTK group.


- In the WITH group, parameters WITH_INCONV, WITH_OPENSSL, WITH_PNG, WITH_TIFF, WITH_XML and WITH_ZLIB must be modified by setting the paths where each of the external iconv libraries are located. These libraries have been extracted before from “dcmtk-3.6.6-win64-support-MD-iconv-msvc-15.8.zip”, and are organized in folders that identify their name. Thus, the parameters would be configured as follows:

Then click again on “Configure”, and once this process is finished, click on the “Generate” button. After all this, a folder “build” is generated with the Visual Studio project that we will use to install the library. It is very important to run Visual Studio as administrator to open this project, since it will perform the installation in folders that require administrator permission to write files.

At this point the first thing to do is to compile the solution in Visual Studio, this process usually takes several minutes.

Once the compilation is finished, the next step is to compile only the INSTALL project, which installs all the library files in the path specified earlier in CMake in the CMAKE_INSTALL_PREFIX parameter.

Next, it is necessary to create the project where the application is going to be developed using the DCMTK libraries. In order to be able to carry out this process it is necessary to create a C++ project with Visual Studio, which can be of any type. However, in my case, as an example for this guide I will create a C++ console application called TestDCMTK.

Now you only need to configure the project to be able to use DCMTK, for this you have to access to the project properties, and in the VC++ Directories section you have to add the path of the DCMTK include folder in Include Directories. While in Library Directories it is necessary to add the path of the folder lib of DCMTK and the path of the folder lib of zlib. In my test case, the result of this configuration would be the following:

zlib is one of the support libraries that have been previously unpacked from dcmtk-3.6.6-win64-support-MD-iconv-msvc-15.8
Finally, go to the Linker -> Input section and under Additional Dependencies add the DCMTK dependencies specified below:
Iphlpapi.lib
ws2_32.lib
wsock32.lib
netapi32.lib
ofstd.lib
oflog.lib
dcmdata.lib
dcmdsig.lib
dcmnet.lib
dcmsr.lib
dcmimgle.lib
dcmqrdb.lib
dcmtls.lib
dcmwlm.lib
dcmpstat.lib
dcmjpls.lib
dcmjpeg.lib
dcmimage.lib
ijg8.lib
ijg12.lib
ijg16.lib
i2d.lib
zlib_d.lib
Simply copy and paste, and the result will be as follows:

The only thing left to do is to compile the entire solution, and then you can start testing and programming the application, as explained in the guide Building a simple DICOM application with C++ and DCMTK, in Visual Studio 2019
